Spirit Shopify Theme Documentation
THEME INSTALLATION
Installation of the Spirit Shopify Theme is easy and quick. Just follow the instructions below:
Download: Spirit-KabukiThemes.zip
- Click 'Upload theme'

- Click 'Upload'

- Click 'Publish theme'

- Click 'Publish'

- Now you are ready to start configuring the look of your store!

CUSTOMIZE THEME
To customize this theme's appearance and settings.
Go to the Administration -> Online store -> Themes
- Click 'Customize theme' for the Spirit theme

- Here you can see all available options for customizing your theme in real-time


- When you are ready with the configuration of your store you will need to click on the 'Save changes' button on the bottom
THEME PRESETS
When you've gone through the settings in the customization panel and decide the look of the website, you can save these settings as presets.
- Click 'Presets'

- Click 'Save current as new preset'

- Select 'a new preset' from the dropdown, choose a name for the preset and click 'Save'

- Now your new preset will appear in the preset list

CHANGE LOGO AND FAVICON
You can set a custom logo and favicon for your website. By default, instead of a logo you have the name of your website and as a default favicon is the Shopify image.


CUSTOM LOGO
- Click 'Use Custom Logo' then click 'Choose file' and select the image you want to use as logo

- You now see the new logo in the settings panel and in the website


CUSTOM FAVICON
- Click 'Use custom icon (16px x 16px)' then click 'Choose file' and select the image file you want to use as favicon

- You now see the new favicon in the settings panel and in the tab


COLORS

Here you can choose from a number of color options for your website.
- Website background color
- Main theme color and hover - these colors make the theme distinct and are used for background color of buttons and other elements as well as text color for links, icons, etc.
- Body text color - this is the main color for the text in your website
- Secondary text color - in different parts of your website, there are text elements for which this option applies i.e. header links (Register, Login, etc.), product box title, etc.
- Elements background color and hover - this color is used for elements like product share buttons, breadcrumb, etc.
- Header background color
TOP PAGE MESSAGE

The Top Page Message option is intended for sale campaign messages, important announcements, etc. You can choose from a number of options to style it just the way you'd like it to appear.

GENERAL
- Website background image - you can set a pattern/texture or an image as a background for your website

- Body text font - this option sets the main website font
- Custom secondary font - this font is used in all headings, buttons, most functional links, etc.

- Sticky header - this will make the header to stick on the top when you scroll the content of any of the pages


- Custom page header background - the image you select here, would be used on pages with a page header element i.e. Contact Us, All Products, Log In, etc.

- Currencies selector - select what currencies you want to be displayed in your shop. Just make sure that you following the instructions on setting up multi currencies.

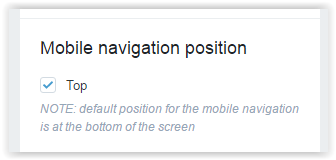
MOBILE
Here you see the settings available specifically for mobile devices:
- You could change the position of the mobile navigation. The default position is Bottom, but you could change it to Top through this setting;


MAIN NAVIGATION

Follow these simple steps to create the all categories wide dropdown for your shop:
- Go to your administration -> Online store -> Navigation
- Click 'Add link list'
- Name your link list 'Shop Dropdown', and add the collections that you want to be displayed
- Use the 'Shop Dropdown' link list in the Main Menu link list as an item in the list
For best user experience (UX), add 4 or 8 collections with equal number of tags under each collection!
- The collections dropdown will be automatically added in your main menu.

HOME PAGE - SLIDER
In this section you can setup a beautiful home page slider. You can choose a number of general options and set as many as 4 slides with fully customizable content.

General settings
- Arrow navigation
- Dots navigation
- Fade/Slide effect and speed of the effect
- Autoplay and speed of autoplay
- Enable dragging

Slide settings
- Text alignment - for each slide, you can choose in what way the content of the slide should be aligned - left/center/right
- Title and size of the text - this is the bigger text in the slide content
- Undertitle and size of the text - this is the smaller secondary text in the slide content
- Button text, text size and a page location - this is used as a link to a page of your choice
- And of course the background image for the slide

For best user experience (UX), use high quality, eye-catching images with width of 1920px and height of at least 750px!
HOME PAGE - INTRODUCTION

Write some text about your store, to welcome your customers and establish a connection with them

HOME PAGE - CATEGORIES

Select 3 collection from your store to be displayed on your Home page

HOME PAGE - PRODUCTS 1 and PRODUCTS 2


In these two sections you can choose a number of products you want to display on your Home page i.e. Bestsellers, New Products, etc. by:
- Creating two collections
- Adding products in these collections
- Selecting the collection from the Collection dropdown
- and finally setting the number of products you want to display

HOME PAGE - SALE OF THE DAY

Select a product which to be displayed on your Home page to draw more attention to it:

- Choose a product by writing it's name entirely in lowercase letters and replacing spaces with dashes i.e. 'My Favorite Product' would become 'my-favorite-product' (or go to administration -> Products -> Products -> your product's page -> in the bottom of the page find and click on 'Edit website SEO' -> in the URL and handle text field, copy the editable part)
- Enable go to product page button - by enabling this option you would replace the Quantity and Buy Button with a link to the product's page

- Show/Hide product description and social buttons
NOTE: Options like CloudZoom, Social buttons, etc. from the Product page options are affecting the Sale of the day! product options
Use product images that are high quality with dimensions of 1024x787px (or smaller/bigger with the same perspective, but no less than 850px in width!)
HOME PAGE - BLOG

This functionality enables you to display a number of blog posts from a certain blog in a slick and attractive carousel

For best user experience, when writting a blog post, use the excerpt functionality. The excerpt is what you are going to see in the Home Page Blog and Blog Posts List page. Insert the main image and a sentence or two, to introduce the blog post.
HOME PAGE - TWITTER

You can connect your twitter account with your shop through these simple steps:
- Sign in to Twitter.
- Go to your settings and select Widgets.
- Click Create new (don't bother to select theme, height or anything else, everything in the Bakery theme is ready to use!)
- Now click on your widget, and look at the URL of the page. There should be a long number i.e. "656119149727514621"
- Copy and paste this number in the Widget ID text field.
- Set how many tweets you want to be displayed in the "Number of tweets" text field
- You twitter feed is ready!

HOME PAGE - PAGE WIDGET
This functionality enables you to insert the content of any page you've created on the Home page of your shop i.e.


HOME PAGE - INSTAGRAM

Connect your Instagram and your shop through this functionality. In order to configure the Instagram widget in your store, you will need to have an access token and user id which you can obtain following the instructions below.
- Create an Instagram app for your store. Just go to https://www.instagram.com/developer/ and log in with your account. From the "Manage Clients" menu "Register a new" client and fill in the necessary information. It is important to specify your store url for the "Website Url" and "Valid Redirect Urls". Then when the client is created click on the Edit button and go to the Security tab. Uncheck the "Disable implicit OAuth" option in order to be able to authorize your app without a server side code.
- Once you register your client you will need to obtain the access token necessary in order to authorize your store in Instagram. For this just enter the following url https://api.instagram.com/oauth/authorize/?client_id=CLIENT-ID&redirect_uri=REDIRECT-URI&response_type=token where you need to replace the CLIENT-ID with the one from your client and the REDIRECT-URI with the one enterd when registering your client. After you have entered this URL you will be prompted to log in to your Instagram account and after that you will be redirected to the home page of your store and the link will look like http://your-redirect-uri/#access_token=ACCESS-TOKEN.
- Finally you need to retrieve your user id in order to display data from your profile like photos, etc. Just open the following link https://api.instagram.com/v1/users/self/?access_token=ACCESS-TOKEN where you replace the ACCESS-TOKEN with the one retrieved in the previous step. If everything goes well, you will be able to see your profile "id".
- Copy and paste both the UserID and the AccessToken into their respective text fields in the Instagram options and choose how many images you want to display.
- OPTIONAL: In addition, you can filter certain images from your profile by HASH tag
Please note that by default your Instagram client will be created in a sandbox mode in which there is a limitation of being able to get the 20 most recent posts only. When the client is created you can submit it for a review in order to be moved in a live mode where no limitations will be present

For best user experience (UX), set the number of images to be 6 or 12 or 18, etc.!
COLLECTION PAGE
There are several options to choose from, on the collection pages:
- Collection tags - choose to show or hide the collection tags list on the collection page


- Number of products per page - unless the "Infinite scroll" option is enabled, take this option verbatim. If the "Infinite scroll" option is enabled, this option means the number of products loaded on each scroll down.

- Infinite scroll - more products on the collection page are loaded when the page is scrolled down.

- Enable the Quick View functionality


- Product ribbon - the product ribbon shows on products with old price. You have two options:
1. Use a custom image as product ribbon
2. Use text for a ribbon and use the options to customize your own product ribbon


- Show/Hide the rating in the product box


PRODUCT PAGE
There are several options to choose from, on the product page:
- Show/Hide quantity box


- Enable/Disable the CloudZoom functionality (NOTE: this option also affects the Sale of the Day)


- Product share buttons - share your product with one click on different social networks (NOTE: this option also affects the Sale of the Day)


- Quick Tabs functionality - select what pages to be displayed inside the Quick Tabs sections. If you have the ReviewsApp installed, you can insert it inside the Quick Tabs or leave it outside of them.


- Related products - choose how many related products you want to display


Use product images that are high quality with dimensions of 800x583px (or bigger with the same perspective, but no less than 800px in width!). Also set 3 or 6 products in the related products section.
BLOG
Choose how many blog posts to be shown on the Blog page

FOOTER
There are several options to choose from, to customize the footer of your shop:
- Description - write a sentence or two, to connect with your customers or important message about your store


- Footer Logo - use the main logo of your shop, remake it in grey-scale


- Enable/Disable newsletter with functionality of Mailchimp integration


- Footer link list 1/2 - select one or two link lists to be displayed


- Social media links - choose from a number of links, to navigate your customers to your social media profiles

